Try This at Home: Learn How to Draw the Titular Characters from When Pencil Met Eraser!
Debug Notice: No product response from API
Pencil loves to draw, and Eraser loves to erase, but at first, the two have very different artistic visions, and they just don’t mesh—Pencil doesn’t like Eraser smudging out his ocean waves, and Eraser doesn’t understand why Pencil doesn’t appreciate the stars he’s erased into Pencil’s drawing of a night sky. Eventually, the pair learns that each has an important function, and that when they work together as a team, their art is unstoppable! The creators of the hilarious book When Pencil Met Eraser shared step-by-step instructions for how to draw their artistic and dynamic duo!
Pencil loves to draw, and Eraser loves to erase, but at first, the two have very different artistic visions, and they just don’t mesh—Pencil doesn’t like Eraser smudging out his ocean waves, and Eraser doesn’t understand why Pencil doesn’t appreciate the stars he’s erased into Pencil’s drawing of a night sky. Eventually, the pair learns that each has an important function, and that when they work together as a team, their art is unstoppable! The creators of the hilarious book When Pencil Met Eraser shared step-by-step instructions for how to draw their artistic and dynamic duo!
Once there was a pencil and an eraser…wait, where are Pencil and Eraser?! Can you help us draw Pencil and Eraser so they can get back to their adventures?
- The Body
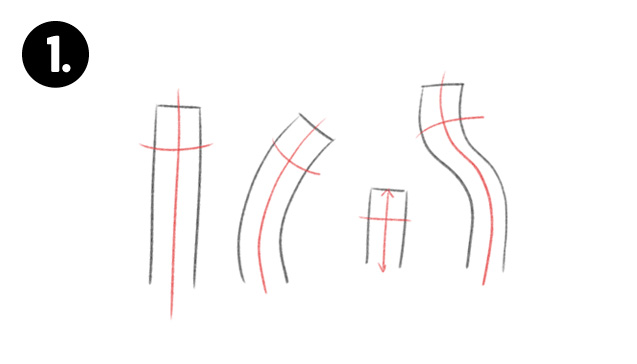
First, decide on the shape and position of Pencil’s body. Is Pencil standing straight or in the middle of creating a masterpiece? Start with an open rectangle that we will close in the next step. If you’re drawing Pencil in action, curve the lines of the rectangle in the direction Pencil is going to be looking. Draw a light cross across Pencil’s body to show where Pencil’s face should be placed later.
- The Point
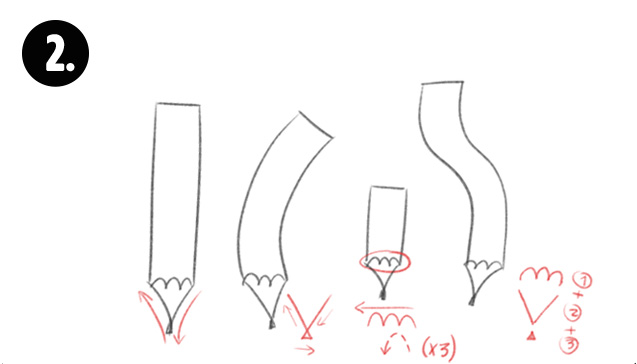
Now it’s time to sharpen Pencil! Make an upside down triangle that comes up to meet the two sides of the rectangle to make the point. Then draw three little bumps across the top of the triangle. Don’t forget to add a little graphite tip to Pencil’s point!
- Eraser
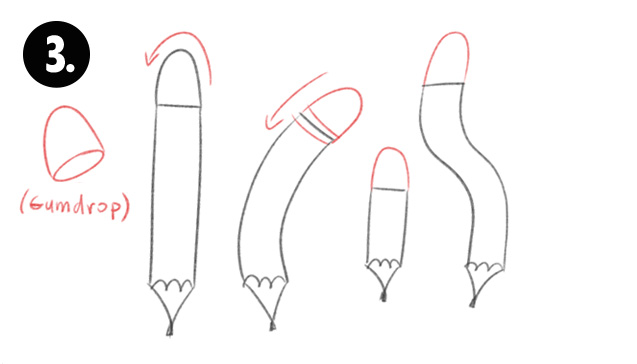
You can’t have Pencil without Pencil’s best friend, Eraser! They really are better together, after all. Just draw a half-oval on top of Pencil. Eraser looks a little bit like a gumdrop!
- Faces
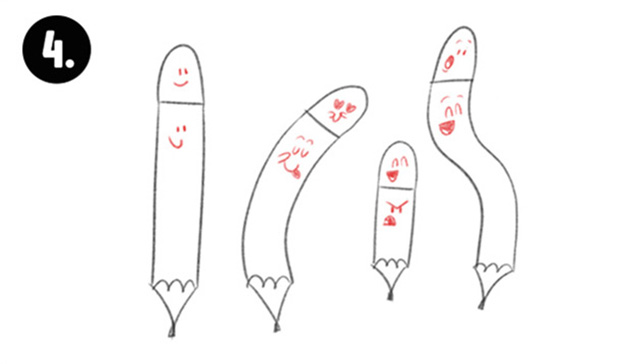
Now let’s bring these two to life! Draw the expressions you want on Pencil and Eraser. Remember the cross we drew on Pencil’s body back in step one? This will help you figure out where to place Pencil’s eyes. What are Pencil and Eraser feeling? Are they happy? Sad? Surprised? Silly? Angry? Excited? You decide! As you grow more confident in drawing these characters, you can explore more facial expressions.
- Finishing Touches
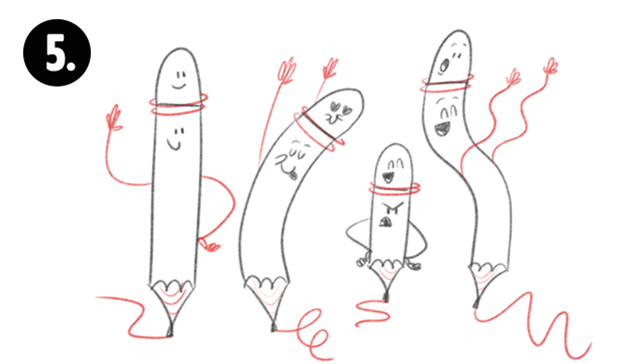
Now for the easy part: Pencil and Eraser’s arms! Their arms are simple squiggle lines with three fingers and a thumb on each hand. When Eraser is on top of Pencil, Eraser’s arms wrap around the top of Pencil’s head, just like the metal piece that holds a real eraser to a real pencil (fun fact: this is called a ferrule!). Give pencil arms, too!
Then you can add another squiggly line out from the tip of Pencil to show where Pencil has been drawing.
- Coloring
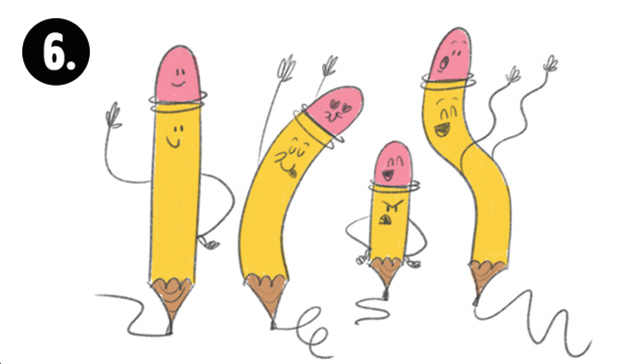
Now for the final step: adding some color to your masterpiece! Grab your crayons, markers, colored pencils, paint, or whatever you’d like to use to color your drawing!
You did it! A-MAZE-ING! With permission from your parents, share your work on social media and don’t forget to tag us @whenpencilmet so we can feature your drawings!
When Pencil Met Eraser is on B&N bookshelves now!